Just for Fun: Linux'ising my Samsung Chromebook Plus V2
Isolation due to Covid-19 outbreak, UEFI block of OS other than Windows on Vaio S (nor alone neither dual-boot), refuse of Samsung to support Linux for Dex (so I lost my Ubuntu) and huge will to have normal Linux pushed me to hack (sorry, hackers, for using this word) into my Chromebook hardware to disable firmware write protection and install Linux instead of Chrome OS. I could use so called "dual boot" from SD card, but it's work very unstable.
At least, the guide for magical transformation of Chromebook into Linux netbook will be here for me, if no one else will be interested in this.
1st we have to enable developer mode.
1. With shut down device press Esc + Refresh + Power to boot into Recovery Mode.
2. When see Recovery Mode boot screen press Ctrl + D, then follow the confirmation step (instructions on screen).
2nd we have to disable write-protection.
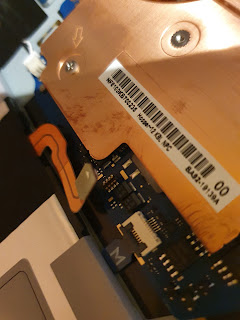
1. Unscrew the bottom. Screws are hidden under rubber knobs (stands).
2. Separate panel by something thin.
3. Disconnect the battery.
4. Plug in charger and boot into Developer Mode (press Ctrl + D) while Boot Warning Screen appeared. Try to press several times, as keyboard works not well with detached bottom panel.
5. Open Crosh by pressing Ctrl + Alt + T.
6. Type shell . Press Enter. Type sudo flashrom -p host --wp-disable
In case of success you'll see some informative strokes and WARNING: SPI Configuration Lockdown activated. OK. SUCCESS.
(source)
Don't forget to attach battery back and assemble Chromebook back.
3rd we have to flash custom firmware.
Small warning: This is the part when we can "brick" our Chromebook. Every piece of hardware can be unbricked, if you have tools. But think twice, if you haven't any.
Personally, I bricked one LG TV and Sony Ericsson Xperia X1, both were unbricked by additional wires and apps. But it took some time to get them.
---
1. Boot into Developer Mode
2. We need Crosh shell again. Ctrl + Alt + T. Enter shell , press Enter.
3. Now we need to download and run script for flashing MrChromebox's custom firmware.
Enter: cd; curl -LO https://mrchromebox.tech/firmware-util.sh && sudo bash firmware-util.sh
4. Follow the menu on screen. As I want to get rid of Chrome OS and install Linux only, I choose option 3) Install/Update Full ROM Firmware.
5. Follow the guide on screen. Don't forget to make your Chrome hardware backup.
(source)
Now we have a netbook with BIOS instead of Chromebook in your hands. However, the installation of Windows on it not recommended.
Don't reboot yet. We have to make bootable Linux USB (don't make it from the same USB with hardware backup).
4th we create Bootable Linux USB
I'll try GalliumOS Kaby Lake distro (source). According to developers, it was build for Chromeboxes and Chromebooks, so it should suit best. But you can choose whatever you want. Please bear in mind that Chromebook Plus V2 is has no any super power, so it is better to choose lightweight distros. I tired to dual-boot Lubuntu and Mint before. Both worked fine.
I'll try GalliumOS Kaby Lake distro (source). According to developers, it was build for Chromeboxes and Chromebooks, so it should suit best. But you can choose whatever you want. Please bear in mind that Chromebook Plus V2 is has no any super power, so it is better to choose lightweight distros. I tired to dual-boot Lubuntu and Mint before. Both worked fine.
1. Download your distro into Download folder.
2. Open Crosh shell again.
3. change directory to Downloads: cd ~/Downloads
4. Plug in USB drive and identify it (i.e. by use of lsbk command and search through the returned list of mounted devices).
5. Unmount USB drive by sudo umount -f /dev/[USB drive partition name]
6. Flash ISO to the USB drive by sudo dd bs=1M if=[distro file name].iso of=/dev/[USB drive name]
The process will be finished once the prompt comes back.
Don't forget to replace [distro file name] , [USB drive partition name] , [USB drive name] by real data in your commands.
5th Install Install Install !!!
1.Reboot (if you choice was to flash Full Rom, you'll have to hard power off your chromebook probably (long press of power button).
2. While on BIOS load screen, press ESC to choose the boot drive. Switch to Boot Menu by arrow buttons, press Enter, choose the drive with distro.
3. Install the Linux.
I'll not guide you through the installation, as the process is full of on-screen guides. So... Good luck and enjoy.
Updates:
Sound issue: Gallium OS for Kaby Lake has not packages for sound hardware.


Comments
Post a Comment